| Page Contents |
| Selecting Text |
Moving Around in a Document |
Keyboard Shortcuts |
Opening Menus From the Keyboard |
Toolbars |
Special Characters |
|
|
|
|
|
Many of the functions you can perform require that you first let the program know which text you want to affect with the actions you're about to take. You do this by selecting text.
To use the mouse, place the I-pointer to one side or the other of the text you want to select, hold down the left mouse button and drag the mouse pointer through all the text you're selecting, then release the button. Once text is selected, you can copy it, cut it, change its size, make it bold, underline or italicize it, to name just a few of the options available.
You can also select text by clicking: double click on a word to select the word, or triple click to select an entire paragraph.
If you move the mouse pointer into the left margin of your document, the pointer will change to a northeast arrow - an arrow that points slightly toward the top right.
| Return to top |
From the keyboard, you can:
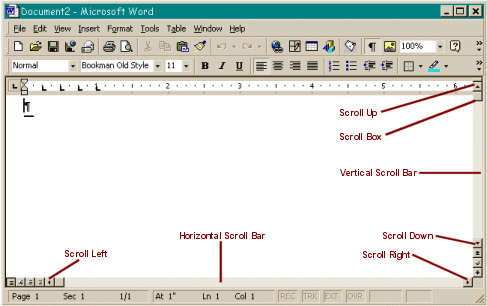
To move around using the mouse, use the Scroll Bars - the Vertical Scroll Bar at the right side of the screen or the Horizontal Scroll Bar at the bottom of the screen. Click on either of the buttons with single arrows (one each at the top and bottom of the vertical scroll bar, and at the right and left of the horizontal scroll bar) to scroll through the document a small distance at a time.
 To move more rapidly, click on
the Scroll Box in either scroll bar and drag it up or down
(vertical), or left or right (horizontal). As you move the vertical
scroll box, page number tags will appear. When you see the page number
you're looking for, release the scroll box (the tags may also contain
heading text if you've used Paragraph Styles).
The buttons with the double arrows at the bottom of the vertical scroll bar let you move from one item in your document to the next, for example, from the top of one page to the top of the next (down arrows) or the previous page (up arrows), or from one graphic to another.
For more information on this feature, click on the Office Assistant, then type Browse by Graphic in the text area and click Search. Select Go to a specific graphic, then select Go to a specific page, table, or other item. One last click on browse object feature and you're there!
Click on the Select Browse Object button (the button between the two with the double arrows) to open a menu from which you can specify how you'd like to browse the document. Move the mouse pointer over each choice, then read the caption at the bottom to see what that choice will do.
For example, you can choose to scroll through a document from one page to the next, from the beginning of one section to the next, from graphic to graphic, etc.
CAREFUL: When you use the scroll bars or the double arrow buttons to move through a document, the cursor position does not change! The cursor is still blinking back there where you left it when you started to scroll. If you want to insert text in the new location, you must click in the document where you want the new text to appear. Otherwise, the text will be added wherever in the document you left your cursor.
| Return to top |
Shortcuts give you a choice. Have you ever thought that, when you're working at the computer, your hands are off the keyboard more often than they're on it? ...that a lot of the work you do involves more pointing and clicking than typing? Have you ever longed for WP5.1 for DOS, which let you do absolutely everything from the keyboard? ...actually, insisted that you do everything from the keyboard? Take heart! Word has great shortcuts that allow you to keep your fingers where they belong for a lot of formatting chores, even allowing you to bypass the menus.
For example, you can change line spacing with a simple 2-key combination. Just type keyboard shortcuts in the Office Assistant's text box and click on Search. The topic comes up right at the top of the list and contains links to lists of every shortcut in Word.
NOTE: Some older keyboards may not work with the methods given here, particularly the keystrokes for moving around a page or a document. If you experience problems, try again with NumLock turned off (the light out). It should work just fine. When you need to use the numeric keypad, turn NumLock on, then turn it off again to be able to use all of the shortcuts. If the shortcuts produce strange results, check to make sure the program knows it's supposed to behave like Word!
- Click on the Tools menu and select Options.
- Select the General tab and make sure that there are no checkmarks in the boxes next to the two WordPerfect options.
- If there are, click in the boxes to remove them.
| Return to top |
To access the menu bar and open a menu:
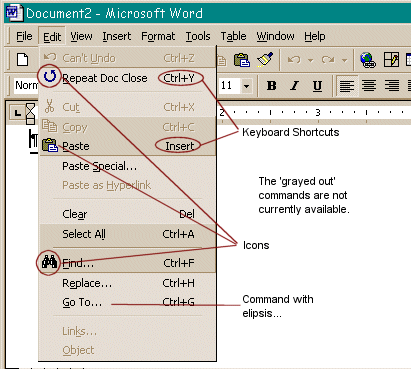
Many menu items are followed by an ellipsis (...). When you see a command such as Print... it means that the command will not execute immediately when you click on it. For example, clicking on the Print... command will not immediately print your document, but will open a dialog box in which you can make certain choices such as which pages and how many copies to print, which printer to use, etc.
 Commands that are
not followed by an ellipsis will execute immediately.
The Save command is an example: when you click on
Save in the File menu, on the Save button
on the toolbar, or use the [Ctrl + S] keyboard shortcut, your
document is saved immediately.
Some items on the menu may be grayed out; this means that they are currently unavailable. For example, if there is no text on the page or none selected, you can't possible make it bold! Most of the commands in the Table menu aren't available if you don't have a table in your document or if the cursor isn't currently in a table.
To find out what a menu item does, click on the Help menu and select What's This? or press [Shift + F1]. The cursor will change to a northwest-pointing arrow with a question mark next to it. Click on a menu, then on a command to open a Help window with brief description of the selected command. For details, click on the Office Assistant window, enter the subject (e.g., Mail Merge), click on Search for a list of topics, then click on a topic to read it.
| Return to top |
You do need a mouse to use the buttons on the toolbars; however, there are keyboard shortcuts for many of the toolbar functions. To see what each button does, hold the mouse pointer over it for a moment. A tag will appear with a brief description of the function. You can set the tool tips to display the keyboard shortcut as part of the description (see Customizing Toolbars or look in Help, first for Customizing Microsoft Word, then for the article on Customizing Command Bars).
If you prefer to work with the mouse, notice that when you access commands from a menu, the toolbar button - when one is available - is shown to the left of the command. Try to identify the buttons on the toolbar for commands that you use frequently. Next time, try clicking on the toolbar button instead of going through the menus. It will usually save you at least a click or two!
The menus in Office 2000 display only the commands you use most often. To expand menus to show all of the commands, place the mouse pointer over the double down arrow at the bottom of the menu. Once you've used a command, it will appear on your personalized menu.
| Return to top |
Select from the dozens of special characters in the various font sets and insert them directly into your document. (Select Symbol... from the Insert menu. To insert foreign characters, select (normal) font, click on the character you need, then click on Insert. (See the article in Word Help: Typing, Navigating Documents, and Selecting Text for more information on using this feature.). Word's Insert, Symbol function uses a limited selection of fonts.
To select special characters from any font, select Programs in the Windows Start menu, then select Character Map in Accessories. Select a font, then a character to display the character's keyboard shortcut (when available). Or click a character, click on Select, then click on Copy to copy a character to the Clipboard. Paste copied characters into your document as required. If it appears as a character that's very different than the one you selected, just highlight it and change the font for that character to the one you were looking at when you selected it!
| Return to top |
|
|
|
|
|