|
|
|
|
| Page Contents |
|
|
|
|
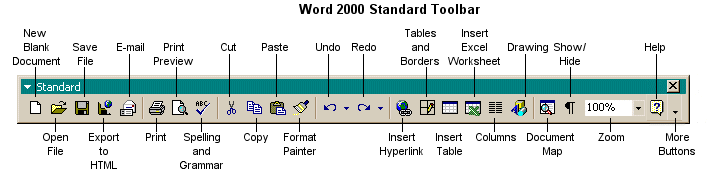
There are a few changes to the toolbars in MS Office 2000, as well as in most newer Windows programs. You'll see a few new buttons, especially those intended for use in Web authoring. One new button lets you send Office files by e-mail from within the application window, instead of creating a message in your e-mail program, then attaching the file.
In this article, changes in MS Office 2000 toolbars are noted. Otherwise, the explanations apply to Office 2000 and Office 97.
Highlight Toolbars in the View menu to see a list all of Word 2000's toolbars. You can also access this list by right clicking on any open toolbar. When you click on a toolbar to display it, a check mark will be inserted next to its name on the menu. To close an open toolbar, click on its name to remove the check mark.
The Customize command at the bottom of the Toolbars list opens a dialog box in which you can add buttons to a toolbar or remove any you feel you don't need. You can rearrange the buttons and even customize button designs. See Customizing Toolbars below for instructions on how to set up the toolbars to suit the way you work and the kind of tools you need.
The following Word 2000 toolbars are available through the Toolbars option:

To add an AutoText entry to the list, simply type it into your document, highlight it, and click the New button. Word will select a name for the entry. Click OK.
The next time you type the first three or four letters of a short entry, or one or two words of longer entries, a text tag will pop up in your document suggesting the entry. When appropriate, just press the [Enter] key and Word will insert the rest of the text for you. The AutoComplete function was introduced in Word 97 , and it's great!
To make sure it will work, open the AutoComplete dialog box by clicking on the left button on the AutoText toolbar. Make sure that there is a checkmark next to Show AutoComplete tip for AutoText and dates.
To create new entries (they can be as long as you'd like, but must be at least 5 characters long):
Clipboard: New in Word 2000. Now
you can collect up to 12 cut or copied objects from all programs,
including your Web browser, and paste them when and where you need them!
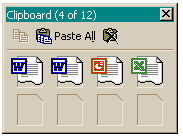
In the graphic, I have collected two items from Word, and one each from PowerPoint and Excel. When I'm ready to paste any of them into the current document, moving the mouse over an icon displays a tool tip to remind me of which one is which.
Click where you want to insert the Clipboard item, then click on the item to insert it.
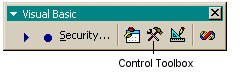
Control Toolbox: Used to insert ActiveX controls into documents. The Control Toolbox is also available on the Visual Basic toolbar.
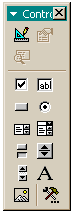 "A control - such as a checkbox, a
list box, or a command button - that you create with the Control Toolbox and
that offers options to users or runs macros that automate a task. When you
insert ActiveX controls in custom programs, such as forms and dialog boxes,
you can write a macro that is stored with the control itself, not just assigned
to run when you click the control. You can make the control 'active' by
writing macros in Visual Basic for Applications that customize the behavior
of the control." (from Microsoft Word 97 Help)
"A control - such as a checkbox, a
list box, or a command button - that you create with the Control Toolbox and
that offers options to users or runs macros that automate a task. When you
insert ActiveX controls in custom programs, such as forms and dialog boxes,
you can write a macro that is stored with the control itself, not just assigned
to run when you click the control. You can make the control 'active' by
writing macros in Visual Basic for Applications that customize the behavior
of the control." (from Microsoft Word 97 Help)
The tools for running and recording macros, designing ActiveX applications,
and access to the Visual Basic Editor and the ActiveX Toolbox are found on the
Visual Basic toolbar.

| Return to top |
|
|
|
|